
Introduction
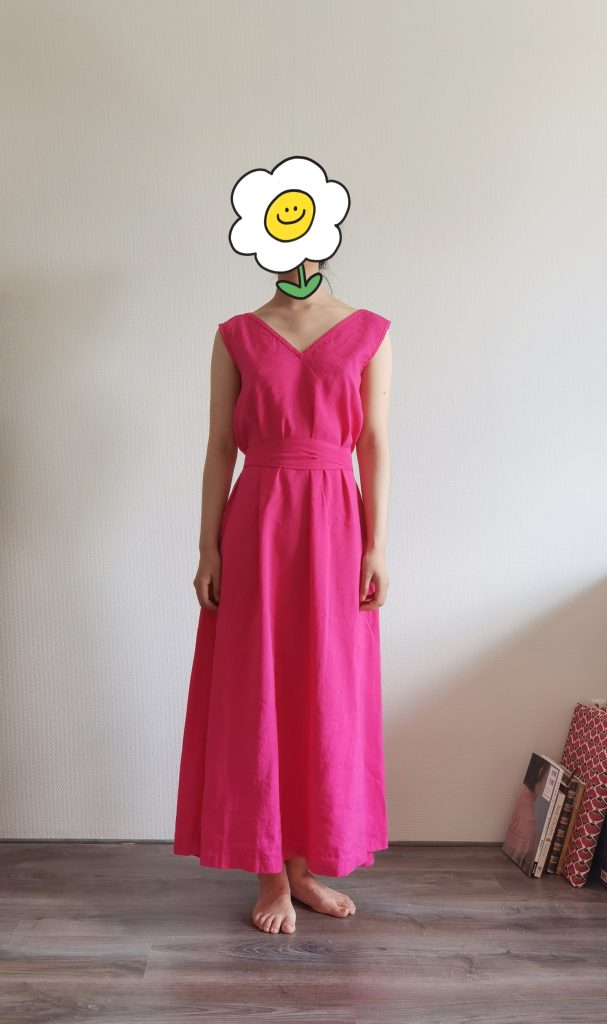
Hey there! It’s been a while. I have been spending the majority of the spring on academic work, but I did finish a few items and will be making more fibre things over the summer. Today I will be writing about this easy pink dress with just enough details for a clean and high-quality finish.
I should clarify that the design is based on an old Margaret Howell dress—so it is not my own. The original dress is linen and came in two colours (mid-blue and black), and it looked fabulous on the runway. I wish I could find and afford it, or had the body to feel comfortable in it…But I thought it would also be nice to make my own.
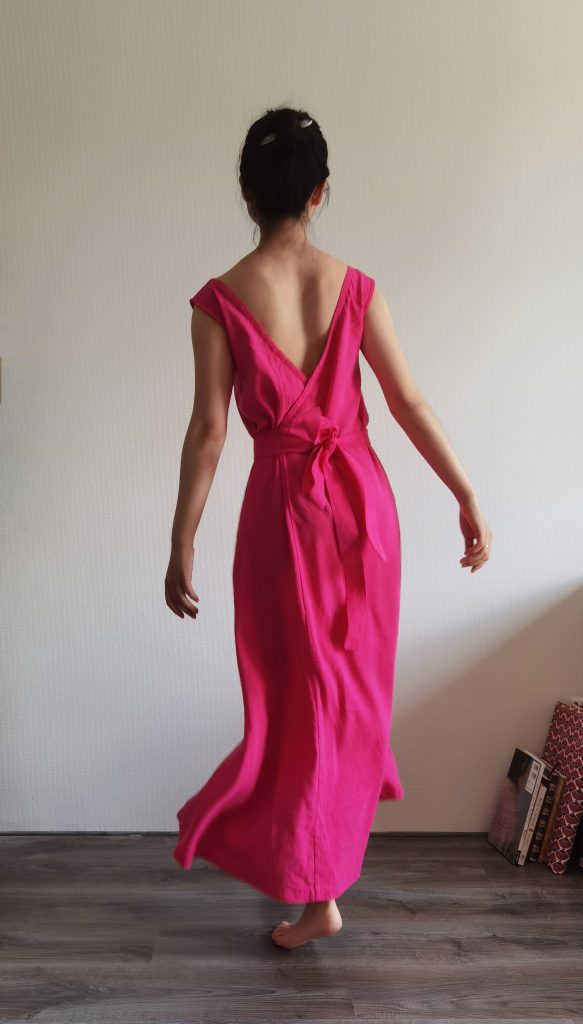
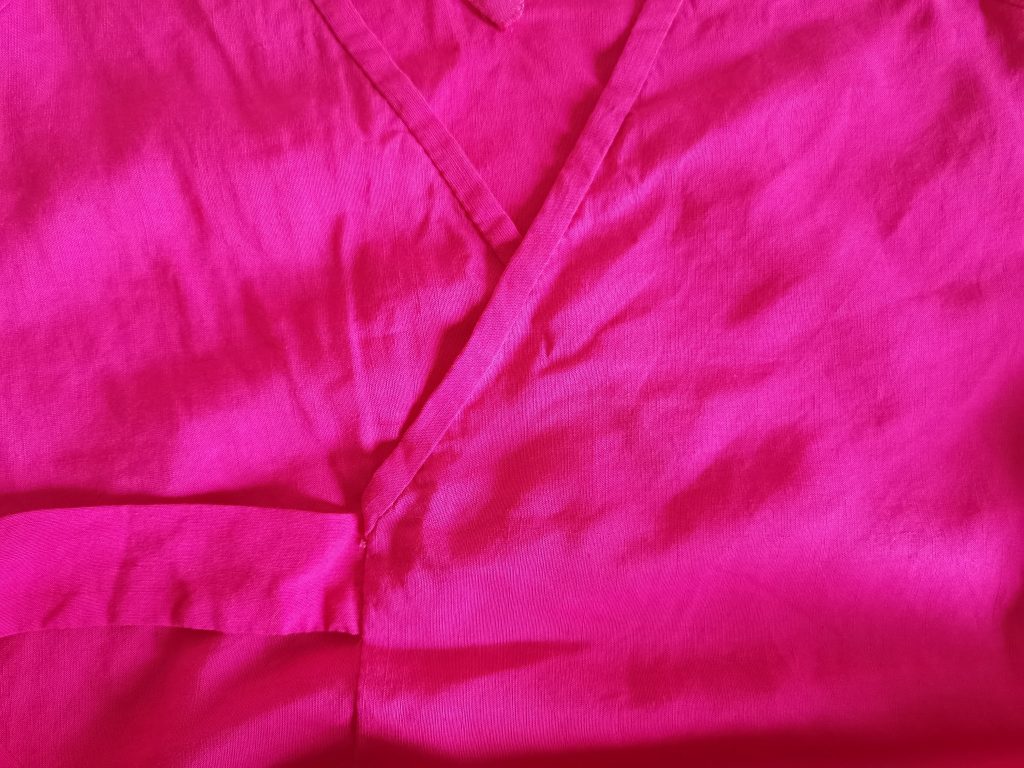
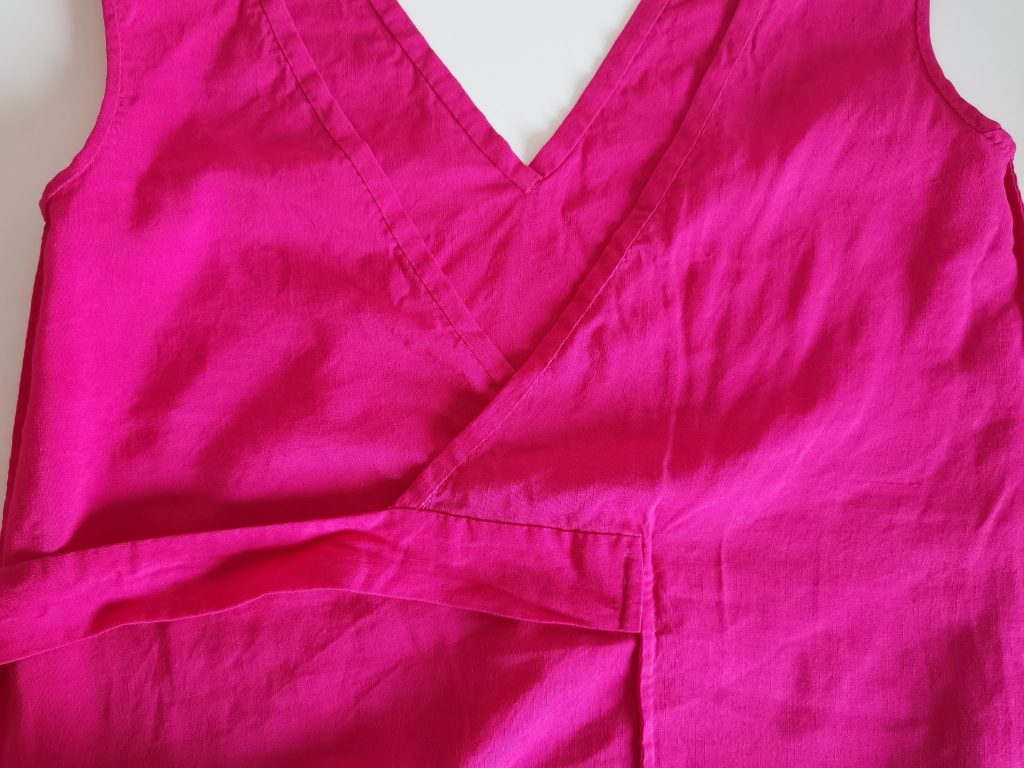
The dress has no waist seam, and the waist shaping relies entirely on the belt. It has a simple V neck in the front and a deeper faux wrapped neckline in the back. The maximum waist measurement is fixed. The front and back necklines are stabilised with bindings cut on straight grain. The armscyes have bias binding. There is an opening on the right side seam to allow the belt to draw through. You may add a button to further close the back neckline if the shoulders tend to slip off (it works for some people; for me it doesn’t.)
Pattern
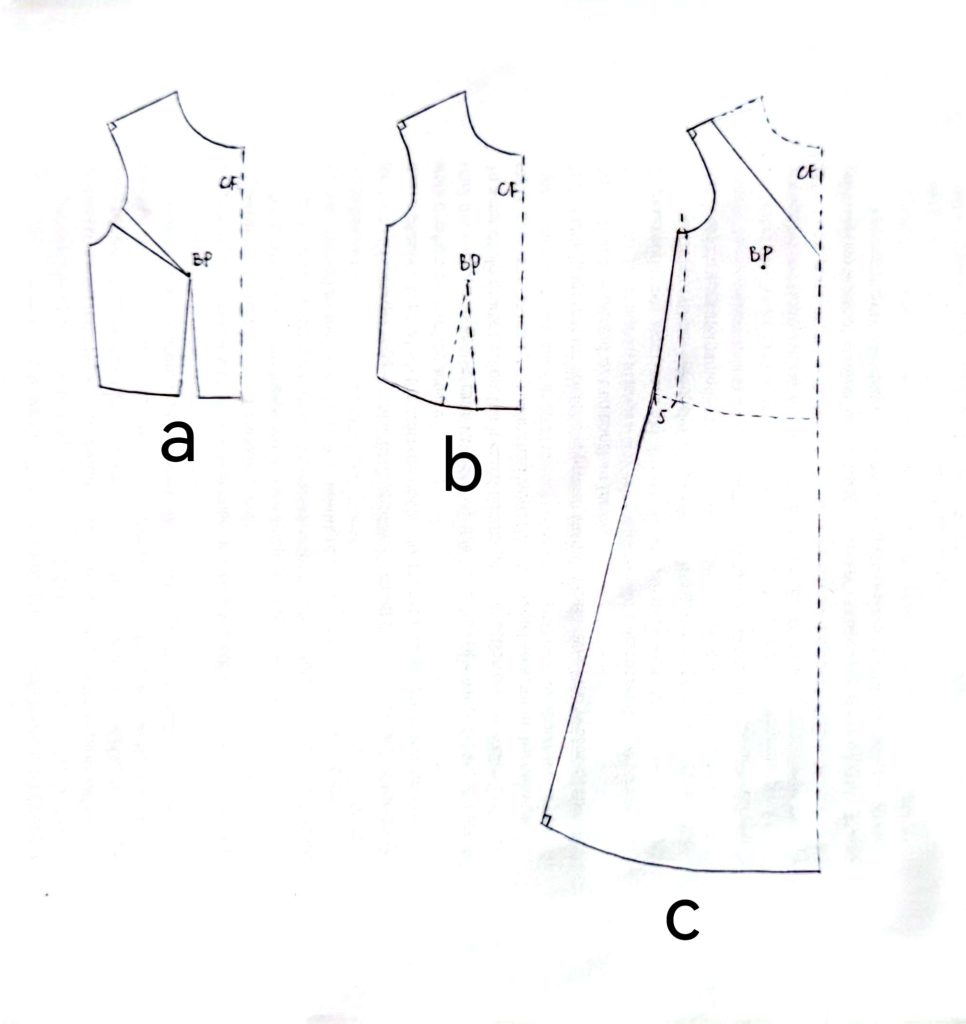
The pattern is easy to draft. We start with a basic bodice block that fits exactly.
Draft the pattern on a folded half of the front:
- Rotate all darts towards the waist. Leave the darts ‘open’ i.e. do not add sewing lines here as they will be gathered when you wear a belt (from a to b in the figure below).
- Add 1cm to the underarm width, i.e. in total 4cm added to the underarm circumference.
- Add 5cm to the waist, i.e. in total 20cm added to the waist circumference. (Adjust Steps 2 and 3 based on your desired positive eases.)
- Draw the neckline on the front.
- You might want to adjust the armscye – for many people, fitted bodices with and without sleeves require different armscye shapes. This includes raising/lowering the underarm point, and increasing/decreasing the shoulder width. (Now you will have the upper body part of c.)
For the back:
- Draw the ‘wrapped’ neckline, taking into consideration the width of the belt. Depending on your body shape, you can just ignore the tiny shoulder dart on the basic bodice pattern, or take it into account when you determine the amount of ease as you sew the binding.
- Leave the waist dart ‘open’ and adjust the underarm and waist as in the front. This doesn’t have to be exactly the same as the front, but note that the neckline gap will become harder to control as the width of the bodice increases.
Skirt:
- Extend the bodice to make the skirt. It is a little tricky for a dress without a waist seam, because the front bodice is often wider than the back to accommodate the chest, whereas the back of the bottom is usually wider than the front for the hips. This can be compensated to some extent by adding waist darts or making the back skirt expand wider than the front (i.e. closer to a quarter circle than a rectangle), but note that neither the back nor the front skirt can be too wide as the waves would not hang in a correct distribution.
- The lengths of the front and back skirts also depends on your chest and hips. For reference: I am around 160 cm tall. The skirt part is 80-85 cm long and falls at my ankle.
- The skirt in the back is divided into two asymmetric panels – see the figure. The part labeled ‘slit’ means the opening through which the ribbon is going to draw.
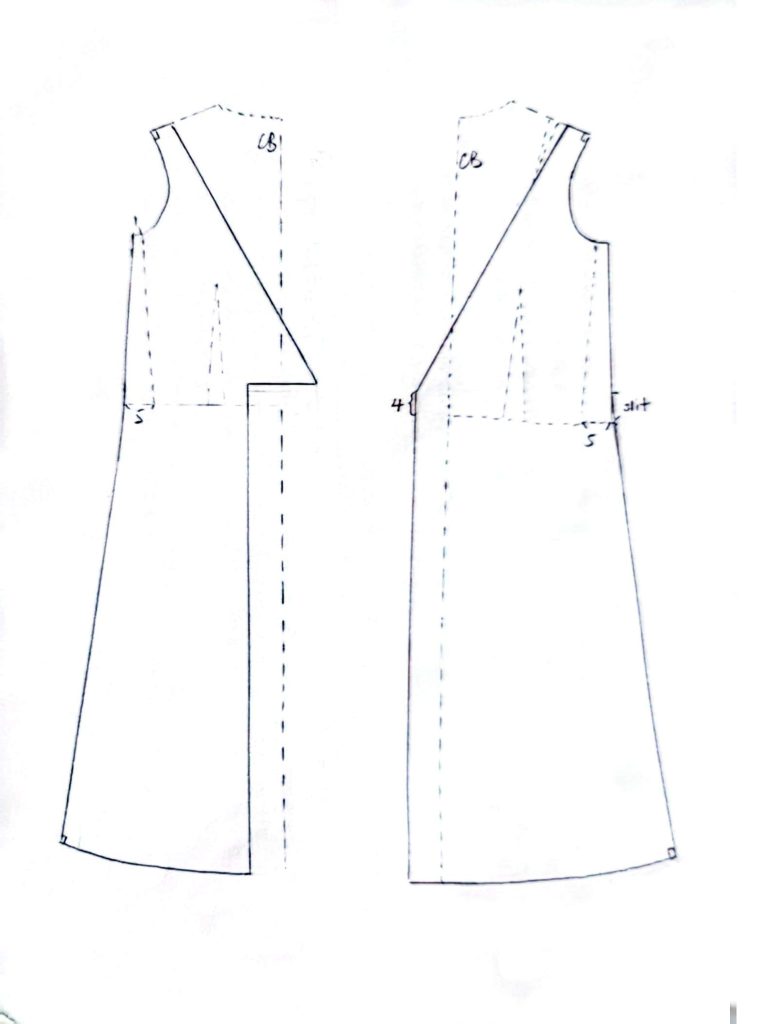
Belt:
- The belt is two ribbons of 4×140 cm. So cut two rectangles of 10×142 cm, with 1 cm of allowance.
Fabric
Choose a drapey fabric if making a longer skirt. Soft silk, cotton and viscose would work well. Linen tends to be crisper so I would suggest reducing both the width and length of the skirt if using pure linen. Alternatively, you can reduce the width of the skirt but keep the length by adding a slit.
My fabric is a blend of linen and viscose. I like how it drapes, but I do not enjoy viscose in general, so I’d infinitely prefer a blend of linen and silk. I cut my patterns along the cross grain, because for some reason this fabric is much stabler on the weft than on the warp. Proof that you don’t always cut along the straight grain!
I used 2×1.4 m of fabric.
Making the Dress
(All seams unspecified are French seams.)
- Finish shoulder seams.
- Add binding to the front and back necklines. I controlled the neckline gap by easing the main fabric into a straight-grain ribbon binding. I eased 1 cm on each side of the front and 1.5 cm on each side of the back.
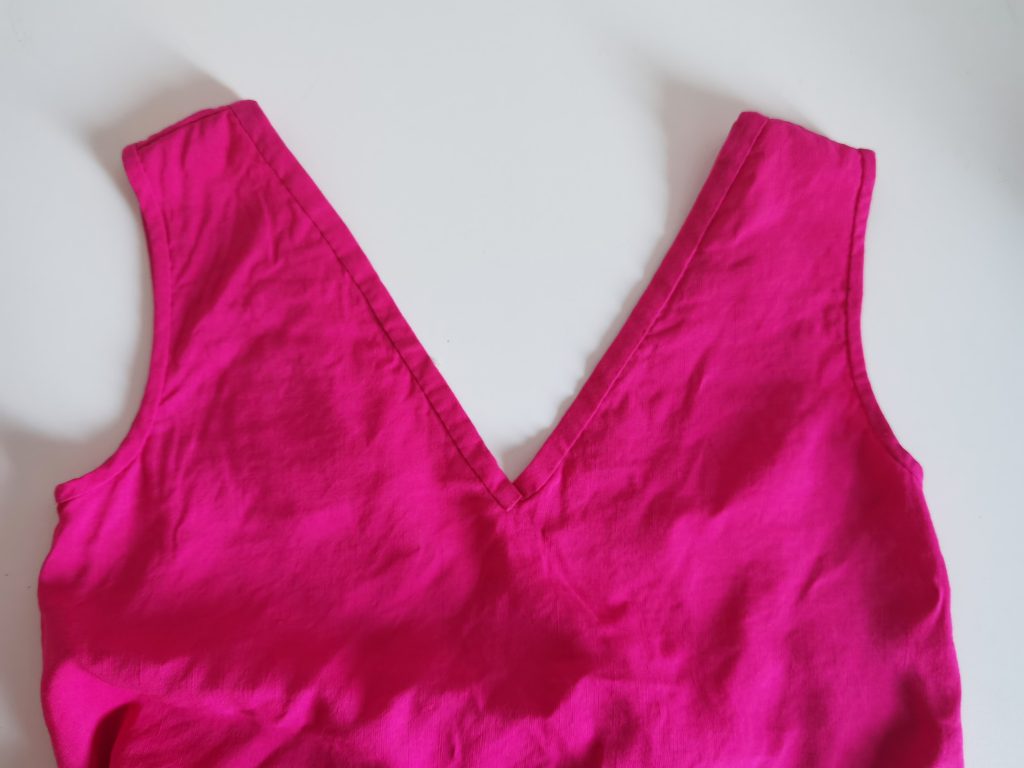
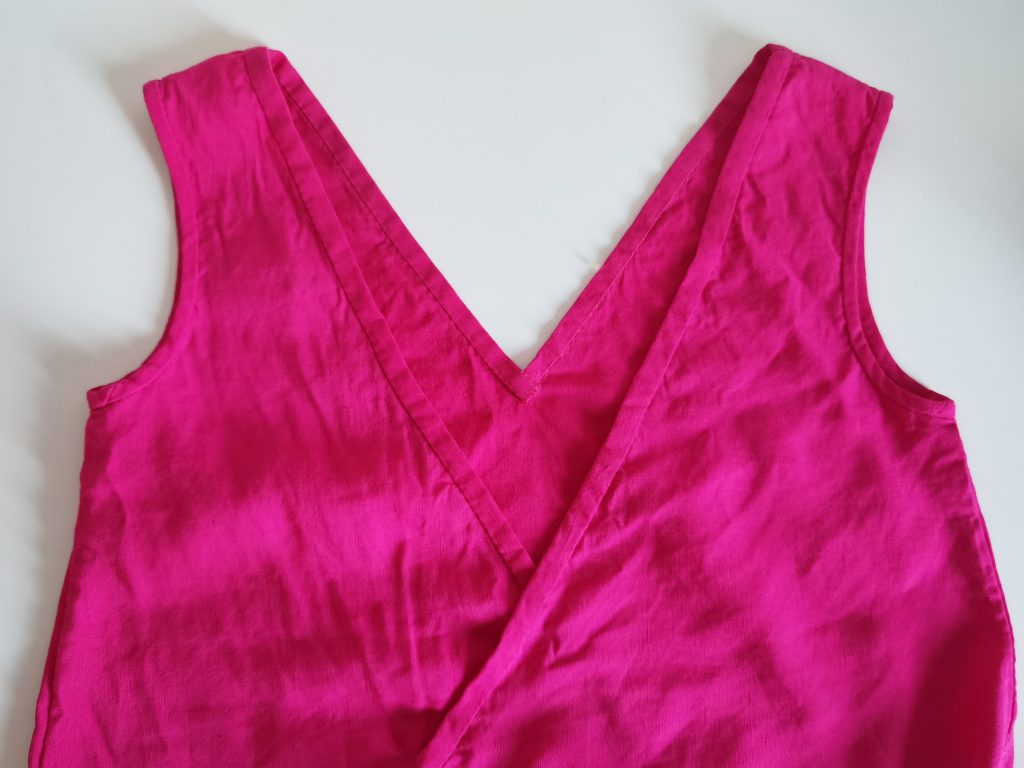
(Pictured below: the front and the back, viewed from the outside.)
- Finish the side without the opening. For me, this was the left side.
- Finish the side with the opening. First, check that the opening is at the correct height. Then just treat it as a skirt side slit from both ends. Add a ‘stopper’ on each end to stabilise the opening.
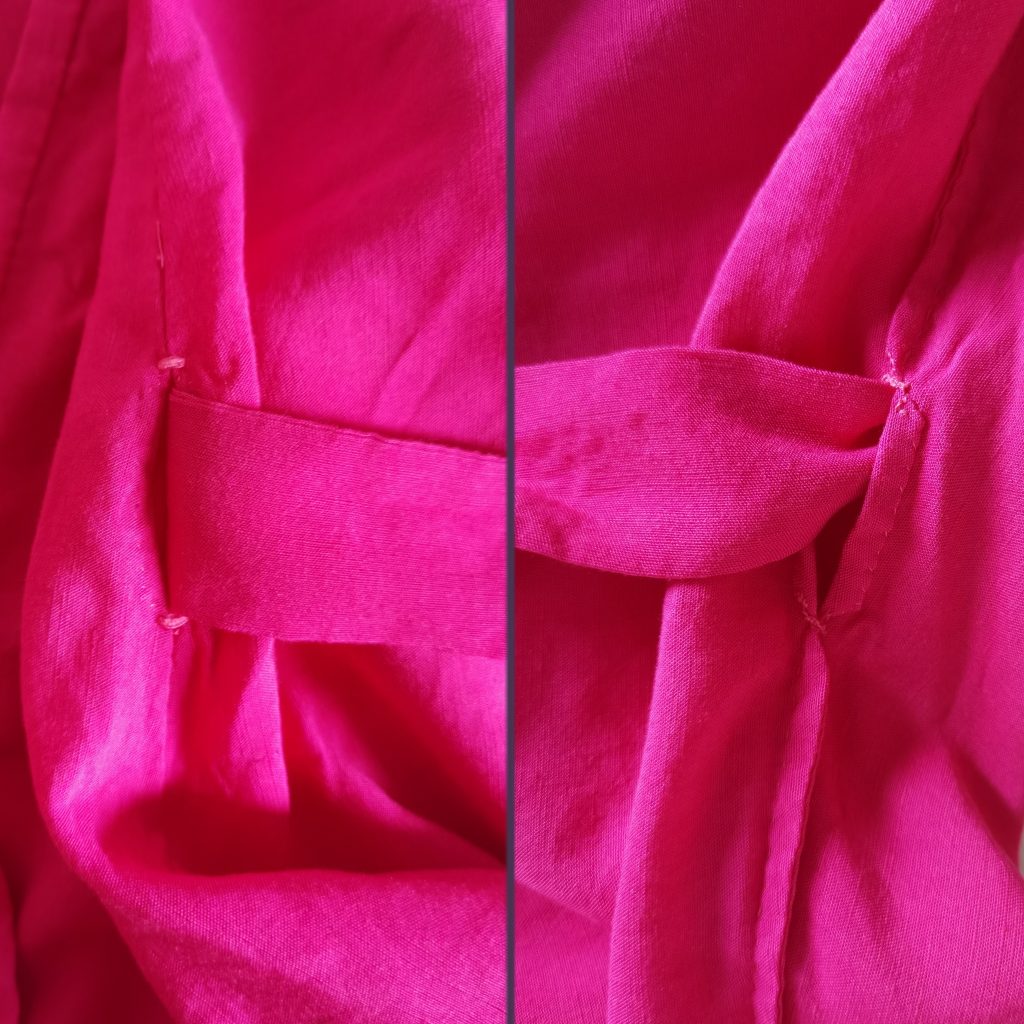
(Pictured above: the opening. The left is the view from the outside, the right is from the inside.)
- Finish the armscyes with narrow bias binding.
- For the belt, finish the ribbon that goes on the ‘upper’ side. Sandwich it at the waist line between the two back panels and finish the back seam (a French seam). I closed both short ends of this ribbon before attaching it to the body, but, in hindsight, the end that goes in the body doesn’t have to finished.
(Pictured above: the ribbon attached to the ‘upper’ back panel, viewed from the outside.)
- Sew the ribbon of the other side, leaving the width of the overlapping part of the bodice open. Finish one short end. Turn it to the right side.
- Attach the unsewn width of the belt to the bodice piece that goes under. The ribbon should sandwich the bodice piece. Finish the raw edge of the short edge. If you have left the short end of the other belt open, you will be able to see it at this step and should encase it as you attach the ‘under’ ribbon.
(Pictured above: the ribbon attached to the ‘under’ back panel and then stitched to the short end of the other ribbon too, viewed from the inside.)
- Check the length and finish the hem. I did a simple twice-folded hem and steam-pressed after each fold, before sewing it down with invisible whip stitches.
There you go😊
This post consists mainly of brief notes. However, if you would like some further explanation, let me know and I’ll try my best!
Leave a Reply
You must be logged in to post a comment.